maven搭建WEB项目4 - 添加springmvc
1、添加springmvc的依赖,在pom.xml中添加
<dependency><groupId>org.springframework</groupId><artifactId>spring-webmvc</artifactId></dependency><dependency><groupId>org.codehaus.jackson</groupId><artifactId>jackson-core-asl</artifactId></dependency><dependency><groupId>org.codehaus.jackson</groupId><artifactId>jackson-mapper-asl</artifactId></dependency><dependency><groupId>org.codehaus.jackson</groupId><artifactId>jackson-jaxrs</artifactId></dependency>
2、在web.xml中注册springmvc
<servlet><servlet-name>springmvc</servlet-name><servlet-class>org.springframework.web.servlet.DispatcherServlet</servlet-class><init-param><param-name>contextConfigLocation</param-name><param-value>classpath:applicationContext-web.xml</param-value></init-param><load-on-startup>1</load-on-startup></servlet><servlet-mapping><servlet-name>springmvc</servlet-name><url-pattern>/</url-pattern></servlet-mapping>
3、配置springmvc
在classpath中添加applicationContext-web.xml
<?xml version="1.0" encoding="UTF-8"?><beans xmlns="http://www.springframework.org/schema/beans"xmlns:xsi="http://www.w3.org/2001/XMLSchema-instance" xmlns:aop="http://www.springframework.org/schema/aop"xmlns:tx="http://www.springframework.org/schema/tx" xmlns:context="http://www.springframework.org/schema/context"xmlns:mvc="http://www.springframework.org/schema/mvc" xmlns:util="http://www.springframework.org/schema/util"xsi:schemaLocation="http://www.springframework.org/schema/beans http://www.springframework.org/schema/beans/spring-beans-3.0.xsd http://www.springframework.org/schema/aop http://www.springframework.org/schema/aop/spring-aop-3.0.xsd http://www.springframework.org/schema/context http://www.springframework.org/schema/context/spring-context-3.0.xsd http://www.springframework.org/schema/mvc http://www.springframework.org/schema/mvc/spring-mvc-3.0.xsd http://www.springframework.org/schema/tx http://www.springframework.org/schema/tx/spring-tx-3.0.xsd http://www.springframework.org/schema/util http://www.springframework.org/schema/util/spring-util-3.0.xsd"><!-- Spring 3.0 configuration --><mvc:annotation-driven /><!-- Allows for mapping the DispatcherServlet to "/" by forwarding staticresource requests to the container's default Servlet --><mvc:default-servlet-handler /><mvc:view-controller path="/" view-name="index" /><!-- 总错误处理--><bean id="exceptionResolver" value="org.springframework.web.servlet.view.JstlView" /><property name="prefix" value="/WEB-INF/jsp/" /><property name="suffix" value=".jsp"></property></bean><context:component-scan base-package="pine.web.controller"/></beans>
4、编写Controller类
@Controller@RequestMapping("home")public class HomeController {@RequestMapping("load")public String load() {return "home";}}5、编写JSP
在WEB-INF下添加jsp文件夹,并在jsp文件夹中新增一个home.jsp
6、修改SS的FORM-LOGIN配置
<form-login login-page="/login.jsp"authentication-failure-url="/login.jsp?error=true"default-target-url="/home/load" always-use-default-target="true" /><logout logout-success-url="/login.jsp" />
其中default-target-url意思是登陆成功后指向的URL,记得去掉http标签中的auto-config="true"的配置项,这样系统在登陆之后就直接会直接转向/home/load这个路径,经由springmvc,将指向/WEB-INF/jsp/home.jsp页面
7、测试一下
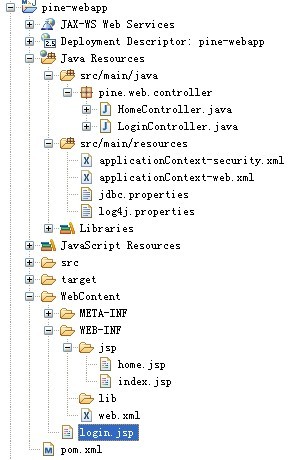
经过多次修改之后整个的项目的目录结构如下