利用webservice和jms实现系统间的数据同步之二
接上一篇文章
此系统采用ActiveMQ作为jms消息服务器
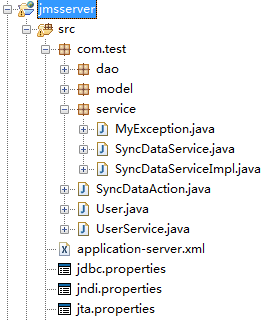
jmsserver系统的结构图如下:
spring配置文件如下:
<?xml version="1.0" encoding="UTF-8"?><beans xmlns="http://www.springframework.org/schema/beans"xmlns:context="http://www.springframework.org/schema/context"xmlns:jaxws="http://cxf.apache.org/jaxws"xmlns:jaxrs="http://cxf.apache.org/jaxrs"xmlns:xsi="http://www.w3.org/2001/XMLSchema-instance"xmlns:aop="http://www.springframework.org/schema/aop"xmlns:tx="http://www.springframework.org/schema/tx"xsi:schemaLocation="http://www.springframework.org/schema/beans http://www.springframework.org/schema/beans/spring-beans-3.0.xsdhttp://www.springframework.org/schema/contexthttp://www.springframework.org/schema/context/spring-context-3.0.xsdhttp://cxf.apache.org/jaxws http://cxf.apache.org/schemas/jaxws.xsdhttp://cxf.apache.org/jaxrs http://cxf.apache.org/schemas/jaxrs.xsdhttp://www.springframework.org/schema/aop http://www.springframework.org/schema/aop/spring-aop-3.0.xsd http://www.springframework.org/schema/tx http://www.springframework.org/schema/tx/spring-tx-3.0.xsd"><import resource="classpath:META-INF/cxf/cxf.xml" /><import resource="classpath:META-INF/cxf/cxf-extension-soap.xml" /><import resource="classpath:META-INF/cxf/cxf-servlet.xml" /><context:component-scan base-package="com.test" /><!-- webserice接收客户端 --><jaxws:client id="userService"address="http://10.78.69.50:8088/webserviceserver/service/user"serviceClass="com.test.UserService" /><!-- restful接收客户端,scope的状态需设置为原型模式 --><bean id="restfulClient"class="org.apache.cxf.jaxrs.client.WebClient" factory-method="create"scope="prototype"><constructor-arg type="java.lang.String"value="http://10.78.69.50:8088/webserviceserver/service/restful" /></bean><!-- 加载jdbc文件 --><bean id="propertyConfig"class="org.springframework.beans.factory.config.PropertyPlaceholderConfigurer"><property name="locations"><list><value>classpath:jdbc.properties</value></list></property></bean><bean id="jndiTemplate"class="org.springframework.jndi.JndiTemplate"><property name="environment"><props><prop key="java.naming.factory.initial">org.apache.activemq.jndi.ActiveMQInitialContextFactory</prop><prop key="java.naming.provider.url">tcp://10.78.69.50:61616</prop><prop key="java.naming.security.principal">system</prop><prop key="java.naming.security.credentials">manager</prop></props></property></bean><!-- jndi连接工厂 --><bean id="jndiConnectionFactory"class="org.springframework.jndi.JndiObjectFactoryBean"><property name="jndiTemplate" ref="jndiTemplate" /><property name="jndiName" value="QueueCF" /></bean><!-- jms session缓存 --><bean id="queueConnectionFactory"class="org.springframework.jms.connection.CachingConnectionFactory"><property name="targetConnectionFactory"ref="jndiConnectionFactory" /><property name="sessionCacheSize" value="10" /></bean><bean id="destinationResolver"class="org.springframework.jms.support.destination.JndiDestinationResolver"><property name="jndiTemplate" ref="jndiTemplate" /><property name="cache" value="true" /><property name="fallbackToDynamicDestination" value="false" /></bean> <!-- 用atomikos实现数据源,使用jta事务管理 --> <bean id="xaDataSource" class="com.atomikos.jdbc.AtomikosDataSourceBean"init-method="init" destroy-method="close"><property name="uniqueResourceName" value="oracle_ds" /><property name="xaDataSourceClassName" value="${jdbc.driverClassName}" /><property name="xaProperties"><props> <prop key="URL">${jdbc.url}</prop> <prop key="user">${jdbc.username}</prop> <prop key="password">${jdbc.password}</prop> </props></property><property name="poolSize" value="${jdbc.poolSize}"/> <property name="maxPoolSize" value="${jdbc.maxPoolSize}"/></bean> <bean id="sessionFactory"class="org.springframework.orm.hibernate3.LocalSessionFactoryBean"><property name="dataSource"><ref local="xaDataSource" /></property><property name="mappingLocations"><value>classpath:com/test/model/*.hbm.xml</value></property><property name="hibernateProperties"><props><prop key="hibernate.dialect">${hibernate.dialect}</prop><prop key="hibernate.show_sql">true</prop><prop key="hibernate.jdbc.fetch_size">50</prop><prop key="hibernate.jdbc.batch_size">25</prop><prop key="hibernate.cache.use_second_level_cache">false</prop></props></property></bean> <bean id="atomikosUserTransaction"class="com.atomikos.icatch.jta.UserTransactionImp"><property name="transactionTimeout" value="300"/></bean><bean id="atomikosTransactionManager"class="com.atomikos.icatch.jta.UserTransactionManager"init-method="init" destroy-method="close"><property name="forceShutdown"><value>true</value></property></bean><bean id="transactionManager"class="org.springframework.transaction.jta.JtaTransactionManager"><property name="transactionManager"><ref bean="atomikosTransactionManager" /></property><property name="userTransaction"><ref bean="atomikosUserTransaction" /></property></bean><!-- 设置事务的传播行为--> <tx:advice id="txAdvice" transaction-manager="transactionManager" ><tx:attributes><tx:method name="find*" propagation="SUPPORTS" read-only="true"/><tx:method name="get*" propagation="SUPPORTS" read-only="true"/><tx:method name="has*" propagation="SUPPORTS" read-only="true"/><tx:method name="is*" propagation="SUPPORTS" read-only="true"/><tx:method name="*" propagation = "REQUIRED" rollback-for="com.test.service.MyException"/><tx:method name="insert*" propagation = "REQUIRED" rollback-for="com.test.service.MyException"/><tx:method name="update*" propagation = "REQUIRED" rollback-for="com.test.service.MyException"/><tx:method name="modify*" propagation = "REQUIRED" rollback-for="com.test.service.MyException"/><tx:method name="delete*" propagation = "REQUIRED" rollback-for="com.test.service.MyException"/><tx:method name="save*" propagation = "REQUIRED" rollback-for="com.test.service.MyException"/></tx:attributes></tx:advice><!-- 事务通知 --><aop:config><aop:advisor advice-ref="txAdvice" pointcut="execution(* com.test.service..*.*(..))" /></aop:config> <!-- 使用spring的jms发送消息 --><bean id="jmsTemplate"class="org.springframework.jms.core.JmsTemplate"><property name="connectionFactory" ref="queueConnectionFactory" /><property name="defaultDestinationName" value="queue1" /><property name="destinationResolver" ref="destinationResolver" /><property name="pubSubDomain" value="false" /><!-- 等待消息的时间(ms) --><property name="receiveTimeout" value="3000" /><!-- 开启事务,注意此处的值 --><property name="sessionTransacted" value="true" /></bean><bean id="syncDao" class="com.test.dao.SyncDaoImpl"> <property name="sessionFactory" ref="sessionFactory" /> <property name="jdbcTemplate" ref="jdbcTemplate" /></bean><bean id="jdbcTemplate" class="org.springframework.jdbc.core.JdbcTemplate"> <property name="dataSource" ref="xaDataSource"/></bean></beans>
web.xml文件如下:
<?xml version="1.0" encoding="UTF-8"?><web-app version="2.5" xmlns="http://java.sun.com/xml/ns/javaee"xmlns:xsi="http://www.w3.org/2001/XMLSchema-instance"xsi:schemaLocation="http://java.sun.com/xml/ns/javaee http://java.sun.com/xml/ns/javaee/web-app_2_5.xsd"><context-param><param-name>contextConfigLocation</param-name><param-value>classpath*:application-*.xml</param-value></context-param><listener><listener-class>org.springframework.web.context.ContextLoaderListener</listener-class></listener> <filter> <filter-name>struts2</filter-name> <filter-class>org.apache.struts2.dispatcher.ng.filter.StrutsPrepareAndExecuteFilter</filter-class></filter><filter-mapping> <filter-name>struts2</filter-name> <url-pattern>/*</url-pattern></filter-mapping><welcome-file-list><welcome-file>index.jsp</welcome-file></welcome-file-list></web-app>
SyncDataAction内如如下:
package com.test;import org.apache.cxf.jaxrs.client.WebClient;import org.springframework.beans.factory.annotation.Autowired;import org.springframework.context.annotation.Scope;import org.springframework.stereotype.Controller;import com.opensymphony.xwork2.ActionSupport;import com.test.service.SyncDataService;@Controller("syncDataAction")@Scope("prototype")public class SyncDataAction extends ActionSupport{ private static final long serialVersionUID = -7231587168221074432L; @Autowired private SyncDataService syncDataService; @Autowired private UserService userService; @Autowired private WebClient restfulClient; /** * 这个action的功能是从webserviceserver系统中通过webservice获取数据 * 并把这些数据通过jms发送出去 * 同时保存数据到数据库 * 具体详见SyncDataServiceImpl的syncData方法 */ public String sync() { try { syncDataService.syncData("queue1", userService.getUserStr().toString()); } catch(Exception e) { e.printStackTrace(); } return SUCCESS; } /** * 这个action的功能是从webserviceserver系统中通过restful webservice获取数据 */ public String restfulSync() { try { syncDataService.restfulSyncData("queue2", restfulClient.path("/caoguowei").get(String.class)); } catch(Exception e) { e.printStackTrace(); } return SUCCESS; }}
UserService内如如下:
package com.test;import java.util.List;import javax.jws.WebResult;import javax.jws.WebService;/** * 从webserviceservice系统调用的webservice接口 */@WebServicepublic interface UserService{ @WebResult List<User> getUserList(); User getUserStr();}
SyncDataServiceImpl内容如下:
package com.test.service;import org.springframework.beans.factory.annotation.Autowired;import org.springframework.jms.core.JmsTemplate;import org.springframework.stereotype.Service;import com.test.dao.SyncDao;@Servicepublic class SyncDataServiceImpl implements SyncDataService{ @Autowired private JmsTemplate jmsTemplate; @Autowired private SyncDao syncDao; /** * 如果发送jms消息失败,或保存数据到数据库失败,则事务回滚,两者都失败 */ public void syncData(String queue, Object message) throws Exception { //发送jms消息 jmsTemplate.convertAndSend(queue, message); //保存数据到数据库 syncDao.insertUser(message.toString()); } public void restfulSyncData(String queue, Object message) throws Exception { jmsTemplate.convertAndSend(queue, message); }}
jndi.properties内容如下:
java.naming.factory.initial = org.apache.activemq.jndi.ActiveMQInitialContextFactoryjava.naming.provider.url = tcp://10.78.69.50:61616java.naming.security.principal = systemjava.naming.security.credentials = managerconnectionFactoryNames = QueueCFqueue.queue1=jms.queue1queue.queue2=jms.queue2
jta.properties内容如下:
com.atomikos.icatch.service=com.atomikos.icatch.standalone.UserTransactionServiceFactorycom.atomikos.icatch.log_base_name = tmlogcom.atomikos.icatch.tm_unique_name = com.atomikos.spring.jms.tmcom.atomikos.icatch.console_file_name = tm.out com.atomikos.icatch.console_log_level=INFO
另外还需要在ActiveMQ的activemq.xml文件中定义两个队列:
<destinations> <queue name="queue1" physicalName="jms.queue1" /> <queue name="queue2" physicalName="jms.queue2" /></destinations>
activemq.xml文件的位置在ActiveMQ安装目录的conf文件夹下,开启服务前要首先气功ActiveMQ
服务,可以通过运行bin目录下的activemq.bat命令启动服务。