5 Ways to Install Java on Linux
http://www.wikihow.com/Install-Java-on-Linux
?
Manual Non-RPM Method
This is the generic method that also works with GNU/Linux clones that do not support RPM. It does not require administrator rights and allows installing multiple Java versions on the same computer.
- 1. Download the JDK.[1].
Ads by Google
Best pay per installHighest payout in the market Start Now!
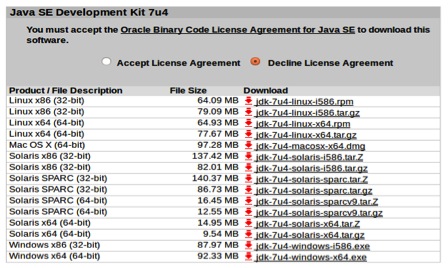
www.installerex.com/- Click on the "Download" link under Java Platform (JDK) 7u4.
- Accept the license and continue.
- Select the right download. Under the "Product/File Description" you should pick your corresponding Linux option. For example, if you're running Linux x86 (32-bit), you need to choose the corresponding “*.tar.gz” version.
- Download the file as a .gz. Save it to your GNU/Linux machine.
- Switch to the directory where you saved the file. You do not need to be a root and only must have the write access to the folder where you wish to install Java. If your administrator is not supportive, you may need to place Java into your home folder or (even better) on some shared network location
- Uncompress the file. For example, you could do this in your home folder. Uncompressing will create a folder called “jdk1.7.0_04”. Java is now installed.
- The installed Java jre is rather independent and can be easily moved into another place just by copying all its files.
- You can install multiple different jre's this way: they coexist together and can be used if some software requires the older version to run.
- Launch Java. The Java executable you need to launch is located in a subfolder, called "bin." This way of installation will not configure a default Java command for you — you must do this manually or always include the full path in your startup script.

Manual RPM Method
This seems like a "more civilized" way to install Java because it allows the installer to check the dependencies on some system libraries that may be missing. However, it does not support versioning easily and may fail even in some systems that do support RPMs. (Though the current Java installations are rather self-dependent and the required minimal requirements are usually satisfied anyway.)
- Download the JDK.[2].
- Click on the "Download" link under Java Platform (JDK) 7u4.
- Accept the license and continue.
- Select the right download. Under the "Product/File Description" you should pick your corresponding Linux option. For example, if you're running Linux x86 (32-bit), you need to choose the corresponding “*.rpm” version, for example “jdk-7u4-linux-i586.rpm”.

- Download the .rpm file. Save it to your GNU/Linux machine.
- Log in as root and switch to the directory where you saved the file. Or, become root by running su and entering the super-user password.
- Install the rpm file by executing 'rpm -ivh filename.rpm', where filename is the name of your .rpm file. (Such as jdk-7u4-linux-i586.rpm).
- You may receive a message telling that program “rpm” is not installed.
- If that is the case the program “rpm” is not installed. You need to install it writing: sudo apt-get install rpm. Enter your password, and you're finished.
- Create symbolic links. If you want to be able to execute this version of Java interpretor or compiler from any directory on your GNU/Linux system, you will have to create a few symbolic links:
- sudo ln -s -v jdk1.7.0_04/bin/java /usr/bin/java
- sudo ln -s -v jdk1.7.0_04/bin/javac /usr/bin/javac
- Note that by installing using this method there could be dependencies that fail. It is better to use the package installer that handles all dependencies for you, since you will not be able to use Java correctly until the dependencies are resolved.
