页面输出时一些常用的小技巧(一)
页面输出时一些常用的小技巧(二)
?
1.菜单一 | 菜单二 | 菜单三(demo1.zip)
?
代码结构:
<ul><li>菜单一</li><li>菜单二</li><li>菜单三</li></ul>
?通常我们会li加css
border-right:1px solid #000
?这样最后一个li也有右边框,是多余的,只能为最后一个li添加一个class来区分(左边框的情况类似)
?
?而demo1中我们为li加css
ul{overflow:hidden;}ul li{float:left;list-style-type:none;border-left:1px solid #000;padding:0 20px;margin-left:-1px;}ul的overflow:hidden和li的margin-left:-1px是为了让最左边li的左边框隐藏起来,这样每个li都可以用一样的样式,便于给li循环
?
2.压缩图片(demo2.zip)
通常web页面中从后台传的图片和设计师设计的图片大小不一样,这个时候需要按照原图长宽的比例进行压缩,不能超过设计师设定的图片大小。
initial是原始图片大小;goal是压缩后的图片大小;max是最大值
当原始图片长宽有任意一个大于对应的最大值或者两个都小于最大值时对图片大小进行压缩
其它情况不压缩
?
function imgSize(element,maxWidth,maxHeight){ $(element).each(function() { var initialWidth = $(this).attr("width"); var initialHeight = $(this).attr("height"); var goalWidth = initialWidth; var goalHeight = initialHeight; if (initialWidth > maxWidth || initialHeight > maxHeight) { if (initialWidth / maxWidth >= initialHeight / maxHeight) { var goalWidth = maxWidth; var goalHeight = (initialHeight * maxWidth) / initialWidth; } else { var goalWidth = (initialWidth * maxHeight) / initialHeight; var goalHeight = maxHeight; } } else if (initialWidth < maxWidth && initialHeight < maxHeight) { if (initialWidth / maxWidth >= initialHeight / maxHeight) { var goalWidth = maxWidth; var goalHeight = (initialHeight * maxWidth) / initialWidth; } else { var goalWidth = (initialWidth * maxHeight) / initialHeight; var goalHeight = maxHeight; } } $(this).attr("width", goalWidth); $(this).attr("height", goalHeight); });}附件demo2.zip是一个类似原理的插件:jquery.LoadImage.demo?
?
3.布局
 (图一)
(图一) (图二)
(图二)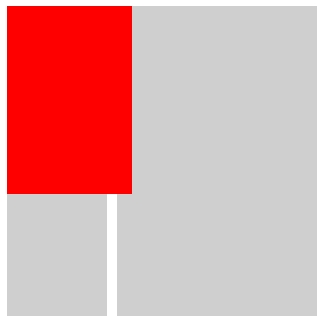 (图三)
(图三)
要实现如图的这种布局,可以用三个并列关系的div加上样式就可以实现
代码结构:
<div id="first"></div> <div id="second"></div> <div id="third"></div>
这种代码结构非常灵活,可以仅仅通过样式达到多种布局效果
?
图一(demo3.1.zip)的css:
<style type="text/css">body{margin:10px;padding:0;}div{background:#ccc;} #first{float:left;width:100px; height:150px} #second{clear:left;float:left;margin-top:10px;width:100px;height:150px} #third{margin-left:110px;_margin-left:107px; height:310px}</style>/*_margin-left:107px;为了ie6多出的3像素而写的hack*/ 图二(demo3.2.zip)的css
<style type="text/css">body{margin:10px;padding:0;}div{background:#ccc;} #first{float:left;width:100px; height:300px} #second{float:right;width:100px;height:300px} #third{margin:0 110px;_margin:0 107px; height:300px}</style>/*_margin:0 107px; 为了ie6多出的3像素而写的hack*/ 图三(demo3.3.zip)的css和js,鼠标hover时当前模块放大比例
<style type="text/css">body{margin:0;padding:0;}div{background:#ccc;position:absolute;}#first{width:100px; height:150px;top:10px;left:10px;} #second{width:100px;height:150px;top:170px;left:10px;} #third{height:310px;top:10px;left:120px;width:200px;} </style><script type="text/javascript" language="text/javascript">function zoom(id,x,y){ // 设置缩放函数参数:容器id、横向缩放倍数、纵向缩放倍数(等比例缩放时也可以设定一个参数) var obj=document.getElementById(id); // 获取元素对象值 var dW=obj.clientWidth; // 获取元素宽度 var dH=obj.clientHeight; // 获取元素高度 obj.onmouseover=function(){ // 鼠标移入 this.style.width=dW*x+"px"; // 横向缩放 this.style.height=dH*y+"px"; // 纵向缩放 this.style.backgroundColor="#f00"; // 设置调试背景 this.style.zIndex=1; // 设置z轴优先 } obj.onmouseout=function(){ // 鼠标移出,设回默认值 this.style.width=""; this.style.height=""; this.style.padding=""; this.style.backgroundColor=""; this.style.zIndex=""; } }zoom("first",1.25,1.25);zoom("second",1.25,1.25);zoom("third",1.25,1.25);</script>?
4 .获取浏览器可见区域的宽高,通用方法:
//以下的方法对于很多浏览器都适用function windowHeight() { var windowHeight;//最后传出的值 if (self.innerHeight) { // 除了IE以外的浏览器 windowHeight = self.innerHeight; } else if (document.documentElement && document.documentElement.clientHeight) { /* IE6 浏览器 */ windowHeight = document.documentElement.clientHeight; } else if (document.body) { //其他版本的IE浏览器 windowHeight = document.body.clientHeight; } return windowHeight;}function windowWidth() { var windowWidth;//最后传出的值 if (self.innerWidth) { // 除了IE以外的浏览器 windowWidth = self.innerWidth; } else if (document.documentElement && document.documentElement.clientWidth) { /* IE6 浏览器 */ windowWidth = document.documentElement.clientWidth; } else if (document.body) { // 其他版本的IE浏览器 windowWidth = document.body.clientWidth; } return windowWidth;}?
5.淘宝的简易框架(demo5.zip)

偶然的机会看到了淘宝的这个框架,写得很不错,玉伯的css也非常工整
圆角的切图也挺有意思的,值得我去学习效仿。
?
6.滚动消息(demo6.zip)
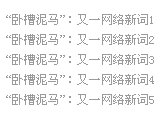
上下往返滚动的消息一般常出现在公告栏或者新闻栏,以前比较喜欢用Marquee标签来实现,不过Marquee实现的滚动会有头尾不能连接起来而导致消息栏出现短暂的空白的缺陷,而且w3c也不支持Marquee标签。所以用js来实现更完美一些。
function scroll(element, delay, speed, lineHeight) {var numpergroup = 5;var slideBox = (typeof element == 'string')?document.getElementById(element):element;var delay = delay||1000;var speed=speed||20;var lineHeight = lineHeight||20;var tid = null, pause = false;var liLength = slideBox.getElementsByTagName('li').length;var lack = numpergroup-liLength%numpergroup;for(i=0;i<lack;i++){slideBox.appendChild(document.createElement("li"));}var start = function() { tid=setInterval(slide, speed);}var slide = function() { if (pause) return; slideBox.scrollTop += 2; if ( slideBox.scrollTop % lineHeight == 0 ) {clearInterval(tid);for(i=0;i<numpergroup;i++){slideBox.appendChild(slideBox.getElementsByTagName('li')[0]);}slideBox.scrollTop = 0;setTimeout(start, delay); }}slideBox.onmouseover=function(){pause=true;}slideBox.onmouseout=function(){pause=false;}setTimeout(start, delay);}四个参数分别是:操作对象, 停留时间,相对速度(越小越快),每次滚动多少(最好和Li的Line-height一致)。?
7. 闪动的消息
<head><title>闪动的消息</title><script type="text/javascript">var styleChangeTimes=0;function changeStyle(id){ obj=document.getElementById(id); styleChangeTimes = styleChangeTimes+1; if((styleChangeTimes%2)==0){obj.style.display="none";} else{obj.style.display="";} window.setTimeout("changeStyle('"+id+"')",200);}</script></head><body onload="changeStyle('text')"><span id="text">您有新的短消息</span></body>??
function imgSize(element,maxWidth,maxHeight){ $(element).each(function() { var initialWidth = $(this).attr("width"); var initialHeight = $(this).attr("height"); var goalWidth = initialWidth; var goalHeight = initialHeight; if (initialWidth > maxWidth || initialHeight > maxHeight) { if (initialWidth / maxWidth >= initialHeight / maxHeight) { var goalWidth = maxWidth; var goalHeight = (initialHeight * maxWidth) / initialWidth; } else { var goalWidth = (initialWidth * maxHeight) / initialHeight; var goalHeight = maxHeight; } } else if (initialWidth < maxWidth && initialHeight < maxHeight) { if (initialWidth / maxWidth >= initialHeight / maxHeight) { var goalWidth = maxWidth; var goalHeight = (initialHeight * maxWidth) / initialWidth; } else { var goalWidth = (initialWidth * maxHeight) / initialHeight; var goalHeight = maxHeight; } } $(this).attr("width", goalWidth); $(this).attr("height", goalHeight); });}这个貌似可以修改为
function imgSize(element,maxWidth,maxHeight){ $(element).each(function() { var initialWidth = $(this).attr("width"); var initialHeight = $(this).attr("height"); var goalWidth = initialWidth; var goalHeight = initialHeight; if (initialWidth / maxWidth >= initialHeight / maxHeight) { var goalWidth = maxWidth; var goalHeight = (initialHeight * maxWidth) / initialWidth; } else { var goalWidth = (initialWidth * maxHeight) / initialHeight; var goalHeight = maxHeight; } $(this).attr("width", goalWidth); $(this).attr("height", goalHeight); });}var obj=document.getElementById(id); // 获取元素对象值 var dW=obj.clientWidth; // 获取元素宽度
第二行报一个缺少对象
clientWidth 不认识
 29 楼 kyvin 2009-08-03 向楼主学习了 30 楼 lucky16 2009-10-16 这些资源都还挺好的的,呵呵,学习了~