DirectX 9.0 C++ 教程 使用3ds max 创建的模型 xfile,mesh
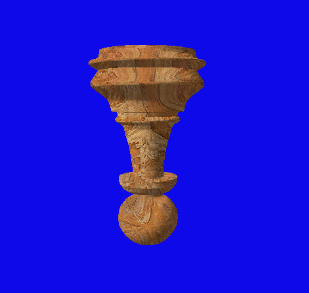
效果图:一个旋转的带纹理的“兵”模型。
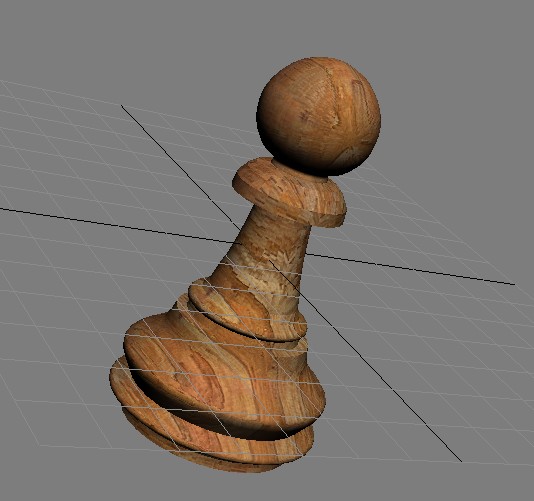
下面这图是我在3ds max中按照 tutorial 中创建的,多了木板纹理,3Ds max中给物体加纹理可以参考3Ds max tutorial中的Materials and Mapping Tutorials。最后我们这里注意要把模型的中心移到坐标的中心,这样我们稍后转换成.x后缀文件,在DirectX中显示才会在中心。
3ds max导出XFile 文件,要用到一个叫做Panda 的插件。下载地址:http://download.csdn.net/detail/fox64194167/4649423 (CSDN下载,免积分)。复制到3ds max的安装目录下的plugins。重启3ds max,对一个.max文件选择 文件(File)下的导出(Export),下拉选择x文件格式即可。不知道为什么有些模型导出.x文件会失败。我们可以用记事本打开.x文件,可以看到很多顶点定义。也可以搜下TextureFilename,就可以看到纹理图片名字。不过很奇怪,我用3DS max的时候,用的纹理图片是wood.boards.jpg,这里却变成了wood.boards.bmp,可能纹理不支持jpg格式的图片?有时候导出.x文件放在DirectX中使用没有纹理就要多注意下纹理图片格式。
3.加载XFile
//-----------------------------------------// File: Meshes.cpp//// Desc: For advanced geometry, most apps will prefer to load pre-authored// Meshes from a file. Fortunately, when using Meshes, D3DX does most of// the work for this, parsing a geometry file and creating vertx buffers// (and index buffers) for us. This tutorial shows how to use a D3DXMESH// object, including loading it from a file and rendering it. One thing// D3DX does not handle for us is the materials and textures for a mesh,// so note that we have to handle those manually.//// Note: one advanced (but nice) feature that we don't show here is that// when cloning a mesh we can specify the FVF. So, regardless of how the// mesh was authored, we can add/remove normals, add more texture// coordinate sets (for multi-texturing), etc.//// Copyright (c) Microsoft Corporation. All rights reserved.//-----------------------------------------#include <Windows.h>#include <mmsystem.h>#include <d3dx9.h>#include <strsafe.h>//-----------------------------------------// Global variables//-----------------------------------------LPDIRECT3D9 g_pD3D = NULL; // Used to create the D3DDeviceLPDIRECT3DDEVICE9 g_pd3dDevice = NULL; // Our rendering deviceLPD3DXMESH g_pMesh = NULL; // Our mesh object in sysmemD3DMATERIAL9* g_pMeshMaterials = NULL; // Materials for our meshLPDIRECT3DTEXTURE9* g_pMeshTextures = NULL; // Textures for our meshDWORD g_dwNumMaterials = 0L; // Number of mesh materials//-----------------------------------------// Name: InitD3D()// Desc: Initializes Direct3D//-----------------------------------------HRESULT InitD3D( HWND hWnd ){ // Create the D3D object. if( NULL == ( g_pD3D = Direct3DCreate9( D3D_SDK_VERSION ) ) ) return E_FAIL; // Set up the structure used to create the D3DDevice. Since we are now // using more complex geometry, we will create a device with a zbuffer. D3DPRESENT_PARAMETERS d3dpp; ZeroMemory( &d3dpp, sizeof(d3dpp) ); d3dpp.Windowed = TRUE; d3dpp.SwapEffect = D3DSWAPEFFECT_DISCARD; d3dpp.BackBufferFormat = D3DFMT_UNKNOWN; d3dpp.EnableAutoDepthStencil = TRUE; d3dpp.AutoDepthStencilFormat = D3DFMT_D16;d3dpp.MultiSampleType = D3DMULTISAMPLE_NONE;d3dpp.MultiSampleQuality = 0; // Create the D3DDevice if( FAILED( g_pD3D->CreateDevice( D3DADAPTER_DEFAULT, D3DDEVTYPE_HAL, hWnd, D3DCREATE_SOFTWARE_VERTEXPROCESSING, &d3dpp, &g_pd3dDevice ) ) ) { return E_FAIL; } // Turn on the zbuffer g_pd3dDevice->SetRenderState( D3DRS_ZENABLE, TRUE ); // Turn on ambient lighting g_pd3dDevice->SetRenderState( D3DRS_AMBIENT, 0xffffffff ); return S_OK;}//-----------------------------------------// Name: InitGeometry()// Desc: Load the mesh and build the material and texture arrays//-----------------------------------------HRESULT InitGeometry(){ LPD3DXBUFFER pD3DXMtrlBuffer; ID3DXBuffer* adjBuffer = 0;HRESULT hr = 0; // Load the mesh from the specified file if( FAILED( D3DXLoadMeshFromX( "pawn-texture.x", D3DXMESH_SYSTEMMEM, g_pd3dDevice, &adjBuffer, &pD3DXMtrlBuffer, NULL, &g_dwNumMaterials, &g_pMesh ) ) ) {// If xfile is not in current folder, try parent folder//这样做主要是为了运行Debug中的Meshes.exe可以正常加载.x文件if( FAILED( D3DXLoadMeshFromX( "../pawn-texture.x", D3DXMESH_SYSTEMMEM, g_pd3dDevice, &adjBuffer, &pD3DXMtrlBuffer, NULL, &g_dwNumMaterials, &g_pMesh ) ) ) { MessageBox(NULL, "Could not find pawn-texture.x", "Meshes.exe", MB_OK); return E_FAIL;} } // We need to extract the material properties and texture names from the // pD3DXMtrlBuffer D3DXMATERIAL* d3dxMaterials = (D3DXMATERIAL*)pD3DXMtrlBuffer->GetBufferPointer(); g_pMeshMaterials = new D3DMATERIAL9[g_dwNumMaterials]; if( g_pMeshMaterials == NULL ) return E_OUTOFMEMORY; g_pMeshTextures = new LPDIRECT3DTEXTURE9[g_dwNumMaterials]; if( g_pMeshTextures == NULL ) return E_OUTOFMEMORY; for( DWORD i=0; i<g_dwNumMaterials; i++ ) { // Copy the material g_pMeshMaterials[i] = d3dxMaterials[i].MatD3D; // Set the ambient color for the material (D3DX does not do this) g_pMeshMaterials[i].Ambient = g_pMeshMaterials[i].Diffuse; g_pMeshTextures[i] = NULL; if( d3dxMaterials[i].pTextureFilename != NULL && lstrlen(d3dxMaterials[i].pTextureFilename) > 0 ) { // Create the texture if( FAILED( D3DXCreateTextureFromFile( g_pd3dDevice, d3dxMaterials[i].pTextureFilename, &g_pMeshTextures[i] ) ) ) {// If texture is not in current folder, try parent folder//这样做主要是为了运行Debug中的Meshes.exe可以正常加载纹理图片 const TCHAR* strPrefix = TEXT("..\\"); TCHAR strTexture[MAX_PATH]; StringCchCopy( strTexture, MAX_PATH, strPrefix ); StringCchCat( strTexture, MAX_PATH, d3dxMaterials[i].pTextureFilename ); // If texture is not in current folder, try parent folder if( FAILED( D3DXCreateTextureFromFile( g_pd3dDevice, strTexture, &g_pMeshTextures[i] ) ) ) { MessageBox(NULL, "Could not find texture map", "Meshes.exe", MB_OK);} } } } // Done with the material buffer pD3DXMtrlBuffer->Release(); return S_OK;}//-----------------------------------------// Name: Cleanup()// Desc: Releases all previously initialized objects//-----------------------------------------VOID Cleanup(){ if( g_pMeshMaterials != NULL ) delete[] g_pMeshMaterials; if( g_pMeshTextures ) { for( DWORD i = 0; i < g_dwNumMaterials; i++ ) { if( g_pMeshTextures[i] ) g_pMeshTextures[i]->Release(); } delete[] g_pMeshTextures; } if( g_pMesh != NULL ) g_pMesh->Release(); if( g_pd3dDevice != NULL ) g_pd3dDevice->Release(); if( g_pD3D != NULL ) g_pD3D->Release();}//-----------------------------------------// Name: SetupMatrices()// Desc: Sets up the world, view, and projection transform matrices.//-----------------------------------------VOID SetupMatrices(){ // Set up world matrix D3DXMATRIXA16 matWorld; D3DXMatrixRotationX( &matWorld, timeGetTime()/1000.0f ); g_pd3dDevice->SetTransform( D3DTS_WORLD, &matWorld ); // 相机位置,如果物体过大,可以调整z轴位置,远离0点,让物体大小显示合适 D3DXVECTOR3 vEyePt( 0.0f, 3.0f,-150.0f ); D3DXVECTOR3 vLookatPt( 0.0f, 0.0f, 0.0f ); D3DXVECTOR3 vUpVec( 0.0f, 1.0f, 0.0f ); D3DXMATRIXA16 matView; D3DXMatrixLookAtLH( &matView, &vEyePt, &vLookatPt, &vUpVec ); g_pd3dDevice->SetTransform( D3DTS_VIEW, &matView ); // 设置视锥体 D3DXMATRIXA16 matProj; D3DXMatrixPerspectiveFovLH( &matProj, D3DX_PI/4, 1.0f, 1.0f, 1000.0f ); g_pd3dDevice->SetTransform( D3DTS_PROJECTION, &matProj );}//-----------------------------------------// Name: SetupLights()// Desc: Sets up the Lights and materials for the scene.//-----------------------------------------VOID SetupLights(){D3DXVECTOR3 direction(1.0f, -1.0f, 1.0f);D3DXCOLOR color(1.0f, 1.0f, 1.0f, 1.0f); D3DXVECTOR3 vecDir; D3DLIGHT9 light; ZeroMemory( &light, sizeof(D3DLIGHT9) ); light.Type = D3DLIGHT_DIRECTIONAL;//方向光light.Ambient = color * 0.4f;light.Diffuse = color;light.Specular = color * 0.6f;light.Direction = direction; light.Range = 1000.0f; g_pd3dDevice->SetLight( 0, &light ); g_pd3dDevice->LightEnable( 0, true ); g_pd3dDevice->SetRenderState( D3DRS_LIGHTING, TRUE ); // Finally, turn on some ambient light. g_pd3dDevice->SetRenderState( D3DRS_AMBIENT, 0x00202020 );}//-----------------------------------------// Name: Render()// Desc: Draws the scene//-----------------------------------------VOID Render(){ // Clear the backbuffer and the zbuffer g_pd3dDevice->Clear( 0, NULL, D3DCLEAR_TARGET|D3DCLEAR_ZBUFFER, D3DCOLOR_XRGB(0,0,255), 1.0f, 0 ); // Begin the scene if( SUCCEEDED( g_pd3dDevice->BeginScene() ) ) { SetupLights(); // Setup the world, view, and projection matrices SetupMatrices(); // Meshes are divided into subsets, one for each material. Render them in // a loop for( DWORD i=0; i<g_dwNumMaterials; i++ ) { // Set the material and texture for this subset g_pd3dDevice->SetMaterial( &g_pMeshMaterials[i] ); g_pd3dDevice->SetTexture( 0, g_pMeshTextures[i] ); // Draw the mesh subset g_pMesh->DrawSubset( i ); } // End the scene g_pd3dDevice->EndScene(); } // Present the backbuffer contents to the display g_pd3dDevice->Present( NULL, NULL, NULL, NULL );}//-----------------------------------------// Name: MsgProc()// Desc: The window's message handler//-----------------------------------------LRESULT WINAPI MsgProc( HWND hWnd, UINT msg, WPARAM wParam, LPARAM lParam ){ switch( msg ) { case WM_DESTROY: Cleanup(); PostQuitMessage( 0 ); return 0; } return DefWindowProc( hWnd, msg, wParam, lParam );}//-----------------------------------------// Name: WinMain()// Desc: The application's entry point//-----------------------------------------INT WINAPI WinMain( HINSTANCE hInst, HINSTANCE, LPSTR, INT ){ // Register the window class WNDCLASSEX wc = { sizeof(WNDCLASSEX), CS_CLASSDC, MsgProc, 0L, 0L, GetModuleHandle(NULL), NULL, NULL, NULL, NULL, "D3D Tutorial", NULL }; RegisterClassEx( &wc ); // Create the application's window HWND hWnd = CreateWindow( "D3D Tutorial", "D3D Tutorial 06: Meshes", WS_OVERLAPPEDWINDOW, 100, 100, 500, 500, GetDesktopWindow(), NULL, wc.hInstance, NULL ); // Initialize Direct3D if( SUCCEEDED( InitD3D( hWnd ) ) ) { // Create the scene geometry if( SUCCEEDED( InitGeometry() ) ) { // Show the window ShowWindow( hWnd, SW_SHOWDEFAULT ); UpdateWindow( hWnd ); // Enter the message loop MSG msg; ZeroMemory( &msg, sizeof(msg) ); while( msg.message!=WM_QUIT ) { if( PeekMessage( &msg, NULL, 0U, 0U, PM_REMOVE ) ) { TranslateMessage( &msg ); DispatchMessage( &msg ); } else Render(); } } } UnregisterClass( "D3D Tutorial", wc.hInstance ); return 0;}文章源地址:http://www.waitingfy.com/?p=277
项目下载:http://download.csdn.net/detail/fox64194167/4651385 (CSDN下载,免积分)
http://www.waitingfy.com/?attachment_id=281 (本站下载)
相关文章:
1.DirectX 9.0 C++ 教程 开发环境设定
2.DirectX 9.0 C++ 教程 第一个程序
3.DirectX 9.0 C++ 教程 绘制三角形
4.DirectX 9.0 C++ 教程 关于Perspective projection,Matrices,摄像头,旋转5.DirectX 9.0 C++ 教程 光照
6.DirectX 9.0 C++ 教程 Texture 纹理映射7.DirectX 9.0 C++ 教程 字体 迟到的helloworld
8.DirectX 9.0 C++ 教程 使用3ds max 创建的模型 xfile,mesh